
The image above is what I used as a reference image for my drawings so I could get the right colours for the flower.

I started by outlining the plumeria flower then I added the colours in with a paintbrush while using a Wacom pen and a Wacom screen. Just like the drawing of the grapefruits in photoshop the plumeria flowers were created in the same way through the layer of different colour of oranges and yellows and through the use of different brushes available on photoshop.
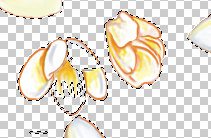
After I was done with the drawing I used a magic eraser tool to erase the white background. As I did so, unfortunately, some of the plumeria flowers were erased on the insides.


No comments:
Post a Comment